Tuesday, December 20, 2011

Simple Gift Wrapping

Good Morning!! And what a great morning it is! I am off from work the rest of this week! wooooohhoooooo!!

I am planning on spending time with my favorite girl and shopping and playing and hanging out. I have a DIY project planned too.

I saw this gift wrapping idea on Pintrest. Love that place!


Such a simple idea with a brown lunch sack. I would have liked to make the tag but dang... I just dont seem to have time for paper crafting lately. So these are gift tags I bought at Hobby Lobby a couple of weeks ago. And the string is twine from PaperTrey Ink. I used the Fiskars boarder punch to add a wee bit of design, then wrapped the twine around and threaded the tag, tied a bow and called it a wrap! FUN. The super simple gift inside is for co workers which consists of two small bags of flavored coffee (each bag makes one pot) and several individual creamer cups.
The total for 3 gifts was $2.66 each. not too shabby!!
Thanks for looking and I hope you enjoy your week before Christmas!!!
Posted by Picasa

Sunday, December 11, 2011

Me and Grace

Happy Sunday Everyone!!
So last night my sister and I took our girls to go see A Christmas Story at TPAC (Tennessee Performing Arts Center). What a fun play that was.
It wasn't a huge Broadway style play. Just a sweet and cozy audience interactive live play.
We ended the evening with dinner. We wanted to walk to a nearby restaurant while we were in the middle of downtown Nashville but it was too late and cold so we ended up at Waffle House! HA!! It was a great time though. Here are pics of me and Grace before we headed out. Enjoy your week as we count down to Christmas!!
Cheers!
~Julie~


Posted by Picasa

Saturday, November 26, 2011

The House That Creaks #9 KITCHEN CABINETS!!

WARNING: LOTS-O-PICS
Hot Dang the cabinets are D.O.N.E.
Wow what a project that turned out to be. I really did enjoy the process, however it took 3 weeks to finish and towards the end I was getting pretty antsy. Working full time and busy weekends doesn't allow much time for this type of project.


I decided to break it down in sections. I have a pretty large kitchen with 26 cabinets and 16 drawers. It is very fortunate to have that many EXCEPT when you are painting them. I had 5 sections and the process was simple but effective: 1. Degrease using mineral spirits 2. Wash with Dawn dish detergent 3. Fill in the extra hole on the handle with wood filler (decided to go with a knob instead of handle) 4. Sand using "liquid sand" (soooo glad I went this way instead of sanding with sandpaper. 5. Prim 6. Paint two coats

The wood filler worked great. I just love that product. The only bad part is having to wait around 8 hours for the filler to harden.

Here is how it looked while priming. Once the paint was on you could not tell one bit that a hole was there once upon a time.

Here is the kitchen I lived in for about a year. I did not move into this. I painted it orange on purpose. I LOVE color. My last house was ALL brown and beige and I was craving some fun VIBRANT colors!

Here is my scrapping/crafting area. It was one thing I was thankful for when we moved in. Last house my craft room was off by itself so I did not have much contact with the family, this way I am still in the middle of everything (my favorite place to be, in the middle). Notice the Island, before I painted it.


Here the door out to the deck is still white and the table is still a honey color wood. It looked horrible against the orange walls.

OH SNAP! check out the scrap area before we moved in. The paint job was hideous and the Formica counter tops were wearing out.

Anyone care to ballroom dance? We were so amazed at the size of the kitchen. Our last house was a super small galley kitchen probably about 6 X 10 feet.

I decided to paint the walls to. I just felt the need to tone down the orange a wee bit. If I'm going to do it, I am going big or going home baby, just couldn't stop at the cabinets, it all needed a make over well okay.. mostly now that the cabinets were a creamy white the orange really clashed with that AND the back splash. I DO plan on a new back splash but. that must remain at the bottom of the to do/wish list for now.

I know I need curtains or roman shades in the window. I will work on that soon enough. That window faces nothing but trees and is two stories up so right now I am not concerned about peeping toms. AH the floor.. YES. one day I do plan on replacing it too. Another reason I had to go beige on the walls. Nothing else seemed to blend very well with the floor and back splash.

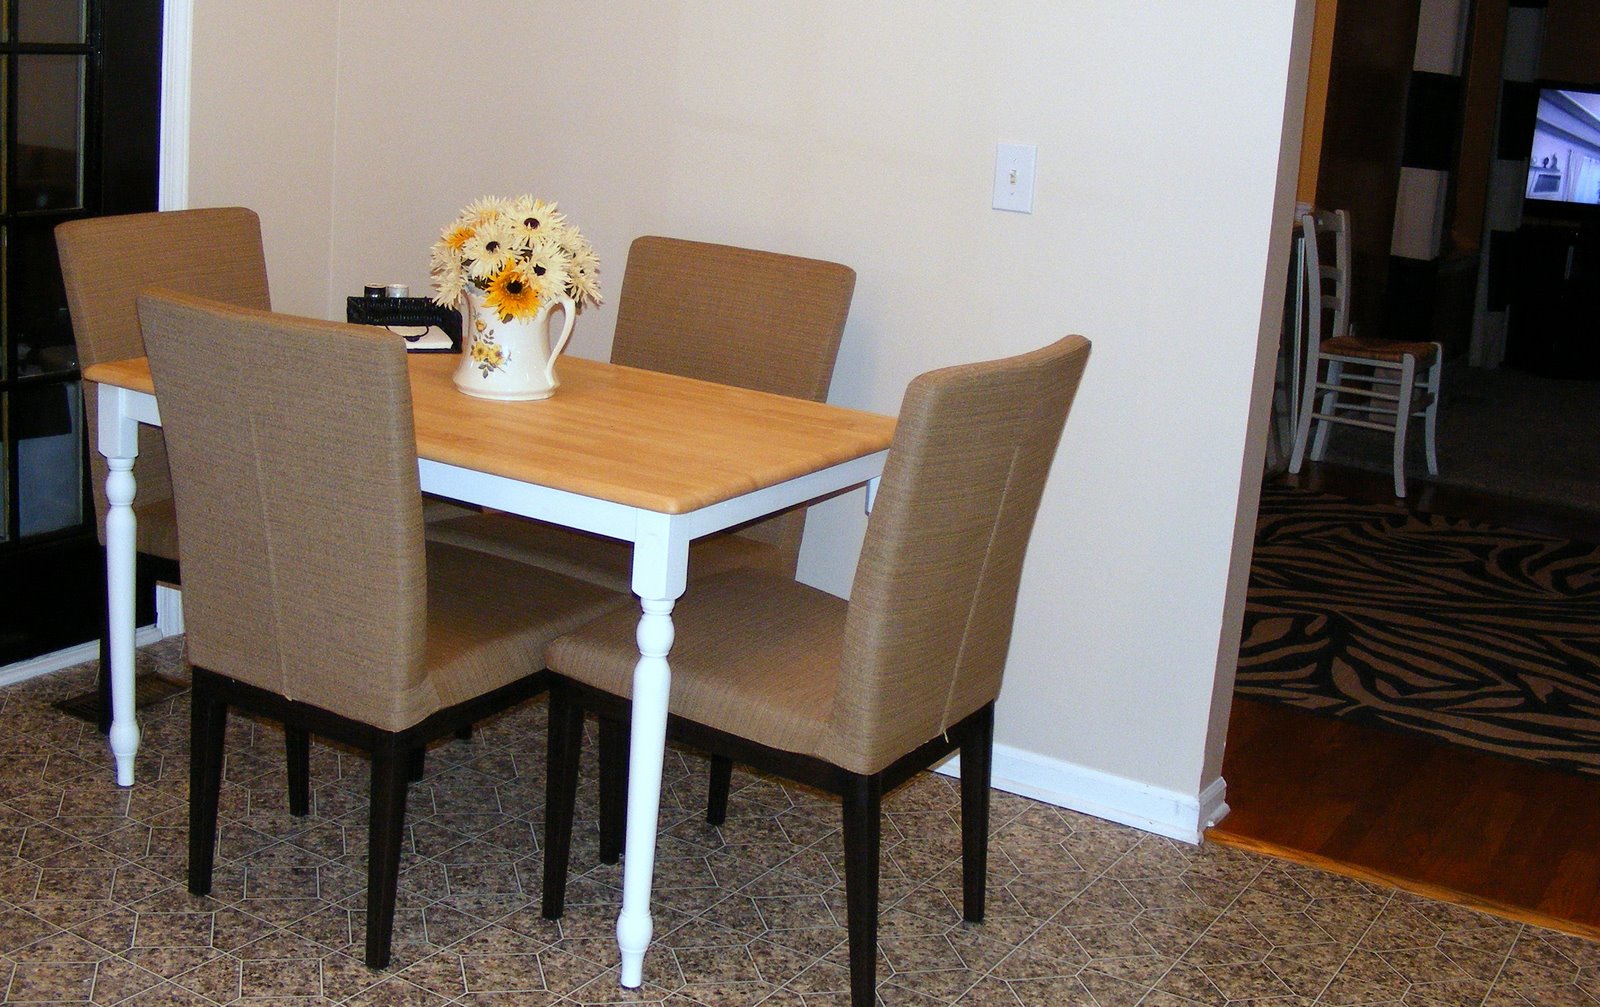
Here is how the table turned out. I planned on staining the top black but my hottie hubs talked me out of it. So we went all natural with just the legs painted.

Here is a glimpse of the door out to the deck painted black.

scrappy area


SWOON!! This pic takes my breath away! seriously! Can you see where the other hole was from the handles before? nope! you cant. I have to tell you the real secret was the paint. Sherwin Williams Waterborne Acrylic Paint. OMG. THE. BEST. PAINT. It is pretty expensive so I would not use it to paint walls but DEFINITELY dressers, desks, cabinets etc. The next most important item to have is a great brush. Purdy is the best in my opinion. The bristles do not come out while your painting. You can wash them over and over and use them for years. Literally. I have!


another scrappy area.. the pics are out of order. I am having difficulty with that!

This was the original chandelier I decided on. Ummmmm.. okay so it did not look like the picture online and the quality was less than satisfactory. you cannot tell from the pic but that thing was HUGE I mean really huge! We got a good laugh and sent it back. I hate sending things back when purchased online. Hubs has banned me from buying things online anymore. LOL lately I have been 0 for 3!

Painting the deck doors

stripping the table.

Posted by Picasa
Here is the chandelier we settled on.
If you are still with me THANKS! I know that was a lot of reading and pics

Thursday, November 10, 2011

The House That Creaks # 8 Refurbished Toy Box

Hello!!! Happy Thursday to you. Thanks for stopping by. In case you have not read my first "House that creaks" episode. I call it that because some areas of the floors in this 20 year old house creak like no body's business! I totally want to fix it but secretly dont want to also because in just a couple of short years my daughter will be a teenager and possibly sneaking out of the house ! HA With these floors she will get caught for sure. Okay anywhoooo.......

I have had this toy box since I was oh.. 9 years old maybe?? It was up in the attic for a long time, then when my daughter was a wee one we got it down for her. Now she doesn't need it anymore. My first initial thought was to make a cushioned seat cover and I did that, but once I finally got the box looking like i wanted to, the material clashed.

Obviously my name was carved in it. If I was not going to have a seat cushion then I needed my name covered up. Got out the handy dandy wood filler. LOVE that stuff, it has been a big helper in quite a few projects. So filled in my name and sanded down the entire box. Primed it and Spray painted it gray. I looked like a big glob. I hated it. It was just missing something. I wandered around blog land. One girl (wish I would have kept her link) had the stencil pattern that I had already printed out from Emily at Jones Design Company.
she had used her stencil on a box and I squealed with delight! I just new I had to use the stencil on my toy box.

I am soooo in love with how it turned out. This is no longer an ugly grey glob. It is a deliciously fun refurbished piece!! YEA ME! oh, and the design is on both sides as well.
I have it sitting on the upstairs landing. I totally hate that lamp. I will be switched out.. eventually. Hopefully sooner than later. Last night i just finished that frame. I really need to hang it a little lower and post about it so, don't look at it yet! teehee

Thanks for looking!
Cheers!
~Julie~


Wednesday, November 2, 2011

My 80's Prom Queen!

This was Grace on Halloween. I will hopefully get a better picture soon. She and my niece found my and my sisters prom dresses. So what better halloween costume than an ugly shiny ruffly 1980's prom dress???? how scary is THAT!! LOL

What really is the scarriest part is that Grace looks almost identical to me when I was that age. Holy Cow, it was crazy.. even her dad was like WHOA!!!

Cabinets are DONE! will show them soon.

Friday, October 21, 2011

Happy Anniversary!


Happy 16 years to the best husband ever!!!
Posted by Picasa

Sunday, October 9, 2011

The House that Creaks #8 Faux Wainscoting


Happy Sunday Night to you! So, I have this project to share that I totally stole from Decor Chick can I just add how much I heart her style. I get TONS of Ideas from her. Click on her name and it will take you to her wainscoting transformation. Her has decorative trim which i would have loved to use however, hottie hubs and I are brand new to wainscoting and wasnt sure we could match up all of the lines with the cuts from the tools that we had. So we settled on some flat trim. and now if we change our mind later and use a more decorative trim, the process will be soooooo much easier.
So I started with priming the area I wanted to wainscot. Hubs made fun of me because I did not measure precisely where to end the white paint. I giggled told him whatever.. to my dismay because we are out of the orange paint that is on the walls! and of course the chair railing was below the white. I cannot get a stinkin' sample of orange paint mixed that matches exactly! Arrg

okay so the next steps where to measure, measure and measure again. I left that part to hottie. I have zero math skills and this was hard core crazy calculations. Well, for me anyway. Hubs has way more patients than I. I am totally kewl with slapping it up on the wall, thank goodness he is not cool like that :-)
Then we got out the chalk line marker thing. You know, the tool that kinda looks like a measuring tape that you pull out and then hold it in place then snap the line and it makes a chalk mark on your surface? Yea, that one..

Next step is to cut out all of your box pieces. We used little glue dots (my scrap booking supplies always come in handy!!) to hold the pieces in place to make sure that is where we wanted them before we started nailing it all in. After that caulk around all the trim and chair rail. Paint a couple of coats and you are done.
Here is the right side in all of its glory... with all that white left above the chair rail! Arrgg (hate it when he is right!)
Here is the left side.

And here is the view going down. I reeeeaaaaallly need to work on my picture taking skills and learn to edit. Hubs work is so much better in person. I look at it all the time and I am amazed at his success at his first go at this! Now.. this project to way longer than we anticipated but totally worth the effort. Especially since he did most of the work! HA!!

Posted by Picasa
Then here is a pic after I painted over the white above the chair rail. You cannot really tell in this pic that the oranges dont match. in all honesty it is very close to the original orange so its not bad. I would love to repaint all of the orange a different color! Hubs says I have to wait for a total of 5 years before repainting. teehee.. only because the staircase and living room where a MAJOR pain in the buttocks to paint. So thats it! be sure to check out Decor Chicks wainscoting. Thanks so much for your visit today!
Cheers!
~Julie~

LINKING UP TO :
Perfectly Imperfect
The Shabby Nest
The Idea Room
C.R.A.F.T.

Monday, September 26, 2011

Almost Time!!

I have researched painting kitchen cabinets and ended up buying this: Sherwin Williams Waterborne Pro Classic in Latex


Here is the color: Dover White in Satin finish


Hard to see, I know. It's a beautiful creamy white.

Also bought a new one of these

BEST. BRUSHES. EVER. !!

I usually do not buy my paint until I will be using it, but today was the last day for Sherwin Williams 40% off sale!! Yippee, so for a $50.00 gallon can of paint I just HAD to take advantage of the sale. Plus I had a $10.00 coupon!! So I got the paint, Purdy brush, Purdy roller refill, and a small paint tray with Tennessee sales tax of 9.25%!!! for a grand total of $48.62. Awesome Possum eh?

Hopefully I will be starting VERY soon!!

Cheers!
~Julie~